Total Pageviews

Showing posts with label maya. Show all posts

Tuesday, 13 December 2016

Tutorial: Creating Realistic Skin for Characters

Hey Everyone!

Tutorial: Creating Realistic Skin for Characters

So I have finally done it, it has been up for a few days now so some of you may have already come across it but my skin tutorial is finally done.

It is split up into 2 parts, One is on the Texturing process the other is on the Look Dev process.
You can find out all about the series in this short intro video I put together: Link

And I also posted one of the chapters on my Youtube channel as a taste test: Link

So here are some close up renders I did to show the final result I will be achieving in these tutorials. I go through every part of the process and none of it is sped up or time lapsed.


Tuesday, 2 February 2016

Orc Bust WIP

So I have been working on the orc bust consistently for the last couple of months in my free time (which is only a couple of hours a day) to try and get this character across the line. You might recognize this guy from about a year ago in my blog. I ended up opening the zbrush file just to grab a piece of armor and then started reworking the form and armor to the point where I thought I should finally take it to a final piece.

Still working on the background for now, but here is a render of where the orc is at, along with a few WIP renders from along the way.

Hopefully I can get this one across the line for good!


Friday, 10 July 2015

Tutorial: Creating a Realistic Human Eye in CG

Hey everyone!


This is an in depth tutorial on how to create a realistic human eye in CG.


This tutorial is broken into 8 bite sized pieces where I go over my process as quickly and informatively as possible. All of the chapters add up to over 4.5 hours of content and you get a whole heap of the files I used in the creation of the eye.

You can purchase and download this tutorial for a small price at this link: https://gumroad.com/tomnewbury

Your support is much appreciated!


Sunday, 1 June 2014

Rock Pile Tutorial

Hey guys

Here is a look at my latest tutorial.
This is another tutorial on how to create a believable pile of rocks.
I have been dealing with a lot of rocky environments at work lately and have come up with a good technique for creating big piles of detailed rocks with very little effort.

Apologies for the quality of the video and audio, I will paste the script below for you to use because it isn't really readable in the video.

SCRIPT:

float $scaleX = rand(1,2);
float $scaleY = rand(1,2);
float $scaleZ = rand(1,2);
scalePP = <<$scaleX,$scaleY,$scaleZ>>;

float $rotX = rand(1,2);
float $rotY = rand(1,2);
float $rotZ = rand(1,2);
rotPP = <<$rotX,$rotY,$rotZ>>;

objid = floor(rand(0.99));


Tuesday, 27 May 2014

Skull Render + shader dev practice

Hey guys

So I really wanted to get a good lighting rig setup with a professional looking clay shader to apply to any model I want to quickly render. I used this skull I sculpted a while back as a test piece.

After many attempts I think I am finally happy with the result.


Monday, 24 September 2012

Cyber Rabbit Project

Hey!

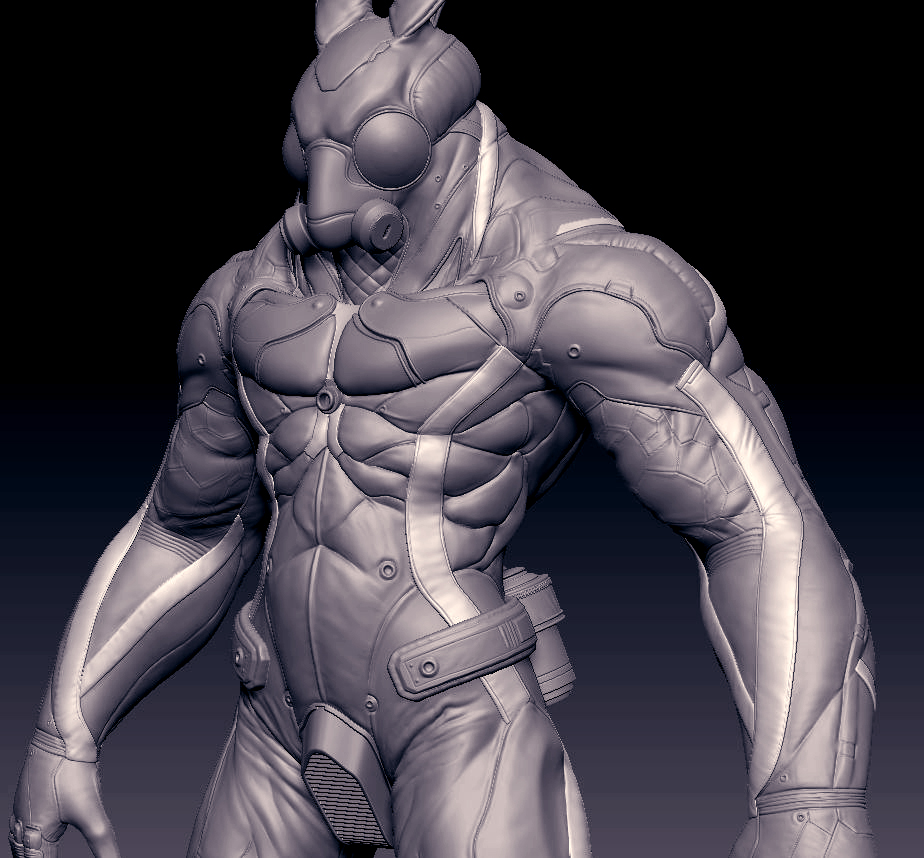
So for the past week I have been working on one of my biggest piece's ever, trying to put together everything I have learnt in the past 2 years into one sculpture. I found this fantastic concept artwork painted by Constantin Maystrenko called Cyber Rabbit.


 I am very close to completing the model, just a few more details and adjustments to go.
Here are some screen shots of the WIP.


I modeled the gun in Maya and now I will add the final details in ZBrush.


The next time I post here it should be of the finished model rendered in Vray. So Keep an eye on this page for that update.

Enjoy

Tom Newbury

Thursday, 9 August 2012

Sci-Fi Channel Bumpers

Hey everyone. Got some exciting news today. The first commercial I have worked on as a freelancer has been put on the internet for all to see. Here is a compelation of most of the shots I worked on.


SF Brand Spot from Sheepish Lion on Vimeo.
And here they are one by one.


SF Ident Transparent from Ink Project on Vimeo.
In this shot I was in charge of modelling all of the layers which you see under her skin. This included the muscles, veins, skull and brain. I matched the objects to the track which was provided for me. I also textured all of these elements and then rendered them off so they could go of for compositing.


SF BIRD 3 from Ink Project on Vimeo.
Here I was in charge of the modelling and rigging. I modelled the birds head and feathers, I also did some displacment passes for the texture artist to use. I also rigged the head and set it up to the track which was provided for me.


SF Polygon 2 from Ink Project on Vimeo.
This was one of the more complex shots. First I created a head, using the mans head as refernce. I then rigged this head, including blendshspes for the blink and mouth movements. I attached my rig to the track provided so his head moved and animated at the same time at the footage. I then created the mesh which his head was protruding through. Once this was complete I wrap deformed the plane to the animated head. In the rendering process the head geometry was hidden so all you could see was the smashed mesh on the surface. I really enjoyed this one because it was a challenge to achive what the director wanted.

My work on the smoke shot was very minimal, I basically just created some of the smoke which rolls up his face.

Here are some work in progress renders and screen captures:

Friday, 13 July 2012

DemoReel test renders

Hey everyone So I got off my slack ass and decided to start making my first showreel (not including the piece of rubbish I created when finishing university...) Here is an example of the different materials which will be applied to each model as it slowly rotates in the scene. Not all models have textures though so they will work a bit differently. (CLICK TO MAKE BIGGER)
Now time to start the never ending rendering... I made some rough calculations on how long some of this is going to take to render and some of the figures I got was 9 days for one model, each one will be different though depending on size and detail. Anyway, will hopfully have the final up and running in the near future. Cheers for looking Tom

Wednesday, 16 May 2012

Another quick update. I adjusted the skin so it now isn't as red. I also added the eyes and created a spec map.
Now onto the hair... Also still have to adjust my render settings to make it a bit cleaner.

Thursday, 26 April 2012

Jason Statham Bust Update

Hey everyone just a quick update. I managed to get the eyes looking semi realistic, still have to work on them a bit more.
Now for the hair.

Wednesday, 11 April 2012

Trooper Bust Final

Hey everyone. Here is the final for the trooper bust. Fully textured and rendered using Maya. Remember I got the idea for the design from 'Chainsaw Droids' trooper concept.
Now back to finishing off the character 'Oak'

Monday, 9 April 2012

Hi everyone. I have been caught up in other work and so havn't been able to get Oak completed as of yet. I have rigged him up using the setup machine plugn for Maya. The skinning needs some tweaks in some areas but other than that here is a screencap of him posed.
I still want to finish creating his staff and a platform for him to stand on instead of some green cubes... ah well, hopfully it will be done soon! Also here is a WIP of a sculpt sketch I did before easter. I want to try and finish him off soon because I like the design. Reference was used from one of 'Chainsaw droids' sketches.
I have also been dabbeling with materials in ZBrush More to come soon!

Tuesday, 27 March 2012

Here is an update of the character fully textured and applied to the animatable mesh. I used a diffuse, normal and displacment map to achive this look.
Here is a wireframe of the character as well, showing the animatable mesh.
Next I will rig the character and then hopfully get him animated and do a few pose renders with a few props and a setting. More to come!

Monday, 26 March 2012

Hey I finally finished the refining and detailing of the character. It has taken me roughly 4 days so far to get to this point.
The next step will be to texture him within Zbrush and then export all of the texture maps to be applied to the model in Maya. Keep a look out for my next update!

Tuesday, 20 March 2012

Production Character Workflow: Part 01

Hey So I started working on a production character the other day for practice. I was going through my many folders of artwork by some of my favourite artists. I came along a concept artist called Joshua James. He had done some concept sketches of some biped creatures. I really liked the shapes he had used in one of them and so I started sculpting it in ZBrush using dynamesh. Here is the sketch done by Joshua James. (blog link: http://joshuathejames.blogspot.com.au/)
Here are some renders of the finished rough model. This is only the first stage. From here I then take it into Maya to be retopologised and UVed.
Here is what the final retopology flow looks like, and the UV's.
The next step will be to sculpt the high resolution mesh. Then I plan to pollypaint the surface. Then all of the maps including displacment, normal and diffuse maps will be brought into maya and applied to the retopologised mesh. Then I plan to rig the character using 'The Setup Machine' and pose him to then be lit and rendered. I will probably end up sculpting some sort of platform for him to stand on as well in ZBrush. Well keep watching and my next post will be the high res model completed.

Tuesday, 13 March 2012

I spent the last few hours doing some light and rendering tests on my skull model. I was aiming for realistic, not sure how well I did though... Ah well practice makes perfect.

Wednesday, 22 February 2012

I really liked the design of the storm trooper helmet, I feel it has  a very vintage design look to it. Mostly due to the fact it was designed for the movie quite a while ago.